

It all started with the magic tree house that the very creative folks at Kidtropolis built. I pondered if I could build something similar in our daughter Alli’s playroom. I put it on my list of things to explore and with most things on the list, the idea sort of simmered for six months.
Towards the end of summer, after having successfully built most of the new darkroom/artroom and workshop, the idea came up in a conversation with my wife Monica. I figured I could swing something similar, though we didn’t want it to be directly the same as the one Kidtropolis built (that just wouldn’t be any fun). After getting a resounding yes from our daughter Alli, we set out to build a tree house.
Monica and I tossed around ideas on what the treehouse should ultimately look like. With Alli’s playroom having nine foot ceilings and Monica having already painted a tree into the corner of the room, we decided that we’d do this properly. Instead of hanging from the ceiling, we’d use a single post on one corner of the tree house that would act as not only a support, but also the position of the tree we’d later create to make it appear that the tree house would in fact be in a tree. To be able to do this, we’d first build the structure, and then create a little artistic gold and make ourselves a tree in part two.
The Tree House structure explained
The design for this tree house is sort of like if you wanted to build a loft or a partition wall; use 2x4’s to create a walls and a base platform. Our tree house would be built into a corner of the room at a size of roughly 5.5 feet long by 2.5 feet wide at 4 feet tall. The structure would be 4 feet off the ground, leaving a foot of clearance between the structure and the ceiling for a roof and tree branches. We’d have a ladder for access and a window for looks. If it sounds simple, it’s because it is; there just isn’t much to it.
Building the structure
The base flooring of the tree house is a box built using 2x4’s on 12 inch centers. The reason I went with 12 inch centers is because of location the walls studs, which I couldn’t move (and as with most things in this house, oddly spaced). 12 inch centers simply worked the best in our situation.
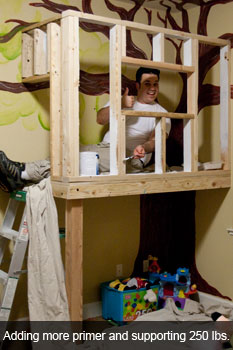
To attach the base box to the walls, I added a level chalk line to the walls at the desired height, marked my stud locations, and then added support blocks to the wall (the base is fairly heavy). Once lifted into place, a couple of 2x4s clamped to the non-wall side act as temporary support legs. To make life simple, I used structural screws in place of lag screws to attach the box to the studs. Unlike lag screws, they need no pre-drilling. They are more expensive and need at least an 18V drill to put into place, so keep that in mind if you want to use them. For me, they’re worth every penny because they save time.
Once attached to the wall I used a 4 foot level to verify that the base was level, marked the length needed to keep it level, and then added the only support leg (a 4x4 post). Keep in mind that two sides of the base are attached to wall studs, so a second support leg was not needed. Once the 4x4 is in place, I added the 3/4 inch plywood base. I joked that we could just leave the platform and see what the kids would do. I was quickly vetoed. :-)
I built the walls like any stud wall, just on a smaller scale. I probably didn’t have to use 2x4 to build the walls (I’ve seen references in older magazines about using 1x3’s), but I wanted this thing rock solid. So I build the walls with 2x4s, and then attached them not only the base but also to the studs in the both walls. The result is a unit that is not going to bend to the will of a group of kids; that unit is simply not coming down. How do I know this? Because I spent the better part of a week purposely trying to break it and pull the unit off the wall. Didn’t happen.
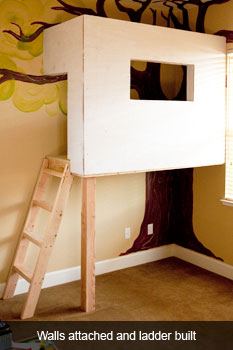
Once the stud walls were to my satisfaction, I added 1/2 inch primed plywood for the outside walls, built a simply ladder using 2x4’s, and added the carpet that Monica and Alli picked out.
Let the art begin
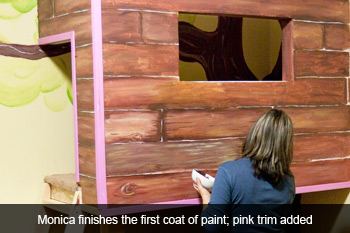
After discussion about the “paint or add reclaimed wood siding”, we went with paint to give it a more fairytale like feel. Since Monica has the neccessary skill and talent to paint (as many of you know, I can barely primer things) and since Alli might find it fun to paint, this sounded like a good idea. That was until Alli decided she wanted the entire tree house pink. She’s four…of course she does. We’re all for making her dream come true, but an entirely pink tree house did not sound like a good idea. So we compromised and added pink trim and promised pink shutters for her windows, to which Alli said yippee. The kid has spirit.
Next time…
In part two of this series we’ll get into the nitty gritty of turning a single support leg into a tree, as well as adding a roof and some finishing touches of a magical tree house.