It€™s no secret that I hack things. If it has a circuit board, wires, or code, chances are I€™m very willing to turn said object into something else that may or may not be useful. As Monica and I have been moving in, I€™ve been itching to do a little down home hacking on the house given it€™s CAT5e wiring, but there was a bigger projects on the list first. Task number one was building a new home theater on the first floor.

We decided to head in to town to our local custom television and stereo shop to get a quote on some gear, try out some sets before shopping online. I typically don€™t get sticker shock; we knew that gear wasn€™t going to be cheap, but after explaining our situation and getting an estimated quote of $10-$15,000 to build what we wanted, we left somewhat dejected. It was well outside of our budget and plans
In that price was a custom cabinet to be built into the alcove, which ran anywhere from $2-$4,000. In a gutsy move, Monica went out and bought me a very nice Craftsman circular saw as encouragement to build it myself. My limited experience in cabinetry (none) made me hesitant, but with Monica€™s encouragement and my good genetic building genes (my dad can build just about anything) I figured what could possibly go wrong. I threw myself into the task of learning how to build an entertainment center.
I researched online. I read books and magazines on cabinetry. I watched design shows on DIY and HGTV. I talked to people. I quickly came to two conclusions; one, I could build it and two, I was under equipped for the job. I had no router, I didn€™t have a fancy table saw, and they all used a nail gun. This was going to require creativity.
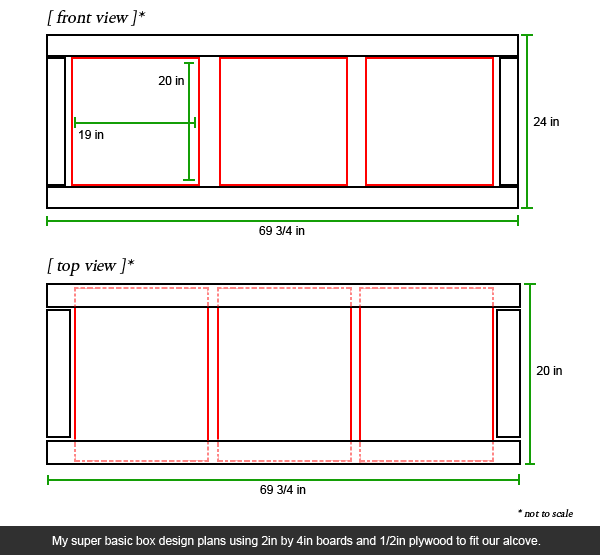
After seeing an episode of Wasted Spaces, I liked the idea of building blocks, or boxes. By simply visualizing that the entertainment center was simply a series of boxes, I could build it. Given the odd walls of the alcove (front to back on the left and right corners were different measurements), I decided this would work. My basic plans looked like this:

My design was simple: using 2x4€™s and 1/2 inch plywood, I would construct a base made of simple boxes which would then be wrapped in oak to match the existing cabinets in the house. To make it more interesting I decided that I had enough room to create three boxes to house gear that would be the proper dimensions for a 19 inch rack, should I decide to put in mounting strips later. Given the height of these boxes, it worked out to about 11U worth of space.
With the plan now firm, I calculated the amount of wood needed and went shopping. In all, I spent about $250 on the wood and some supplies and went to work.
With the entertainment center coming together, after careful research we decided what and how our system would be built. We decided on the following pieces of hardware:
* Mitsubishi Diamond Series 65" DLP WD65833 (<a title="GO TO: Mitsubishi TV" href="http://www.mitsubishi-tv.com/j/i/18326/TelevisionDetails/WD65833.html?cid=5469">link</a>)
* Marantz SR5002 A/V Receiver (<a title="GO TO: Marantz" href="http://us.marantz.com/Products/2207.asp">link</a>)
* (2) SpeakerCraft AIM8 Three (<a title="GO TO: SpeakerCraft" href="http://www.speakercraft.com/#Products:16:AIM8%20Three">link</a>)
* (2) SpeakCraft AIM Wide Three (<a title="GO TO: SpeakerCraft" href="http://www.speakercraft.com/#Products:409:AIM%20Wide%20Three">link</a>)
* (1) SpeakerCraft AIM LCR Three (<a title="GO TO: SpeakerCraft" href="http://www.speakercraft.com/#Products:409:AIM%20Wide%20Three">link</a>)
* (1) Velodyne DLS-4000R Subwoofer (<a title="GO TO: Velodyne" href="http://www.velodyne.com/products/product.aspx?ID=12&sid=252v155g">link</a>)

The sound gear was easy to come by at the local sound shop, and by taking advantage of a couple sales (the center channel, subwoofer, AVR), we were able to get the sound system in it€™s entirety for about $3,600 (about $1,500 off the total sticker price).
The television was another story. After seeking out a local shop that sold it, the only place we could find wanted the MSRP of $3,399. California sales tax alone would bring the price up near $3,700, and they wanted a delivery fee of $150. Needless to say, we did not choose this option. Since the cabinet wasn€™t finished, we decided to head online to find a reputable outlet to sell and ship.
We turned to Amazon.com. They had several vendors selling the item at over $1,200 off the MSRP with free shipping. This sounded good. We ordered through Amazon.com, expecting the usual series of events to occur. Monica and I had both ordered items from Amazon.com and their never ending list of third party sellers and had never had a problem. That was until this television.
Two canceled orders and three weeks later, there is no television. Amazon.com had failed on a massive level; they lied about the shipping information from one of the vendors (I talked to the vendor and they had received no order) only to cancel the order and not inform us, locked us out of two accounts, and then having the audacity to ask us to order again because ‘we value your business’. I sent over 30 emails, placed 10 phone calls…you don€™t value my business, which you just lost.

We finally ordered the television from OneCall.com, located in Spokane, Washington. Best service ever; they called an hour after the order was submitted, let me know all the details about the shipping, and explained it would be there in three days. When the television arrived via FedEx Freight on time, it was if it hadn€™t been touched. Not a dent or scratch. The ShockWatch was intact (impressive, given their sensitivity which Monica and I later tried out). OneCall.com called about an hour after delivery to verify that everything was good. We can€™t recommend them enough. With shipping, we paid only $2,200 for the television.
With TV having arrived, what to make of the cabinet? Did encouragement and genetic makeup help overcome my complete lack of experience in wood work? Yes, they did. The base cabinet had come together nicely, and using some struts from the base up to the top shelf which would house the center channel speaker, added support. We used oak baseboard and door trim to finish various edges of the cabinet, which gave it very nice finish.
For the doors, we decided to go with black speaker cloth centers, allowing the subwoofer to be housed to the right of the television. By using 2 inch trim, we cut holes in three 20 inch by 21 inch oak boards to allow the sort of recess type that you would most often see in a frame (1/4 inch all the way around). By creating basically box panels (think painters canvas frame), we stretched the speaker cloth and stapled, and inserted them into the door panels. IR signals from the remotes will actually pass though, though we€™ve been using the IR blaster which came with the television.

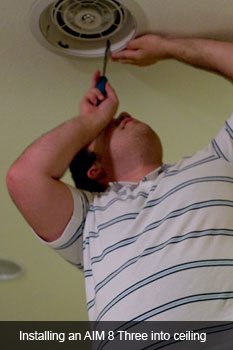
The rest of the installation was a breeze. The speakers required our original ceiling holes to be cut out slightly more, allowing for the bigger speakers that we had purchased (SpeakerCraft give you a cutting template with each speaker). The hardest part about the speaker install was that they weighed more than expected and took some finesse to get in. The preexisting wiring worked without any issues and configuring the 5.1 surround sound thought the Marantez AVR was a breeze (my brother Jim reconfigured it for optimum sound as well, which was nice).
The Mitsubishi WD65833 comes out the box with pretty good picture quality and color. I reconfigured it using a THX DVD, but otherwise the picture quality is stunning. We€™re waiting on adding Blu-ray to the mix, but our Sony 480p DVD gets up converted by the television to 1080p and it looks stunning. HD content using a Dish Network ViP 722 is stellar and watching Euro Cup 2008 has been a treat. You just can€™t beat high definition soccer.
Everything in the living room was measured and arranged to optimize the viewing and listening experience. To figure out all the logistics of this scene of musical chairs, I used Carlton Bale€™s Home Theater Calculator, an Excel spreadsheet which does a really nice job.
All said and done after wiring everything up, building an entertainment center into the alcove, and configuring the hardware, watching films or playing video games has become an immersing experience. Coming in at a little over $6,000 for everything out the door, we€™ve been pleased with the performance of the system and have no plans on changing anything out. I am planning on doing some custom wiring of PS2/3 and Gamecube/Wii control ports, but that€™s for a different day.