

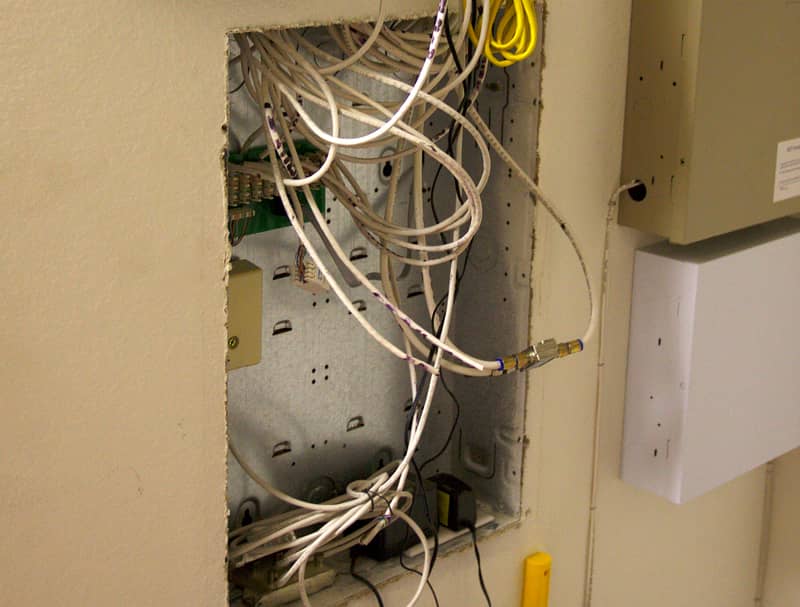
When we purchased the house in 2008, one the major selling points was the fact that entire house was wired with Cat5e, available all in a GE Smart ConnectionCenter network panel in the master bedroom closet. The panel also contained all of the coax for any cable or satellite hookups, as well as both phone line connections. Great I thought, this will make things easier. I was sort of right.
The panel is good in theory, but was poorly executed by the house builder. The cable runs of both the Cat5e and the coax aren’t run in conduits but are rather free-run. The problem with the free-run is that some of the cables are mighty short in that box and don’t get me started on the kinks I’ve seen in the attic (no need for a max bend radius uh?).
The panel contained only one GE component: a naked 1x10 port telco board. None of the nice looking integrated components on the website. From the prices I saw, retail price for the rough in box and the telco board: $80. Trying to get those fancy nice components turned out to be either hard to find or down right expensive for dated gear. Gigabit switch? Not available. 8 port 10/100 switch cost $150. Doesn’t include universal box power supply. All said and done, it was going to cost way too much money, and I wasn’t going to end up with what I wanted.
So I decided I’d do something that I’d like.
The great panel re-imagining
As you can probably see from the first picture, I inherited a mess of cables. They’re poorly marked (you can’t really tell which cable goes to what room) and some of them as I mentioned are nearly too short to work with. As temporary solution, I shoehorned a Netgear router I had lying around and ATT modem to wall and we were connected to the Internet. It was crappy, but it worked for a while.
The connection drops from the router, the general chaos of the phone system not working half the time, it was enough to lead to the following plan: %^&* that original panel, and $%^& that wiring job. My more detailed plan was as follows:
- Wire all the Cat5e cables into a single 24 port patch panel
- Re-wire the 10 port telco board to a 12 port patch panel
- Mount those patch panels to a wall mount
- Install new gigabit switch
- Install new m0n0wall firewall
Buying the pieces
I picked up a Soekris Net4521 with wifi card and case for just $50 on Ebay to run m0n0wall (which I think was a pretty good price). It even came with m0n0wall installed on a CF card.
Next, I picked up the patch panels, mount, and short cables from Monoprice. I’m a big fan of Monoprice, because they sell really great solid components and cable cheap. I spent under $90 for all the pieces.
The last item I picked up was a NetGear JGS524 ProSafe 24 Port Gigabit Rackmount Switch for $120 on Ebay; new they run roughly $240, this one was a refurb unit with a 30 day warranty. It’s not a managed switch, but it’ll do for the purpose at hand.
The build out
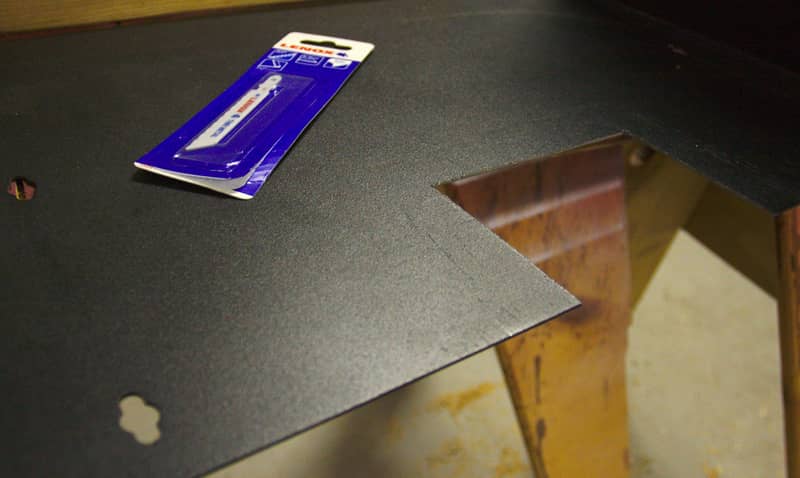
The first thing I needed to do was attach the wall mount bracket to the wall. I went with a 7U unit (which is very nice), but I needed a notch in the mount so I could run the cables to the patch panels. So I took my trusty Makita jigsaw, used a 32tpi thin metal cutting blade on speed 4 position 1 and notched out a 5 inch by 3.5 inch hole (that blade cut through that metal like butter for those wondering). I’d then notch out a hole in the drywall and re-reroute the cables. This was the plan, and that plan soon was thrown out the door.
As with most things when it comes to this house, interesting building choices give me a headache. Where there was supposed to be a stud, there was not. 16 inch on center, but the stud literally vanished about 3 inches above the original panel. Sure enough the stud had been cut in half some point before the drywall installed. Why, I have not idea, but having cut into the drywall I could see that it was in fact cut (with no obstruction above it…I have no idea why they did it). Lovely.
With no means to mount the 7U bracket above the original panel (I had not studs!), I was left with only one option: mount the bracket on top of the original GE panel, or at least partially. There were solid studs directly on each side, so this would work. It would just be more interesting.
So I marked out my holes, drilled using a 3/16 inch bit and using 1/4 inch by 3 inch lag screws with washers fastened the bracket to the studs. I then notched out the drywall slot in line with the previous notch I made in the bracket and pulled the Cat5e runs into the new bracket. Viola, bracket attached.
I then went to work attaching the Cat5e cables to what I’m calling the master patch panel. This panel allows to me to patch to either the phone system or the gigabit switch for any given port in the house.
Monoprice includes a simple 110 punch tool with each patch panel, and I used it without issue. No doubt if I’d do more of this sort of thing, I’d buy a nice impact punch tool, but the basic worked for me in this instance. I’m not going to get into the finer points of using a punch tool or how to wire a patch panel (this video gives you an idea). I went with T568B termination since everything at the wall is terminated in T568B.
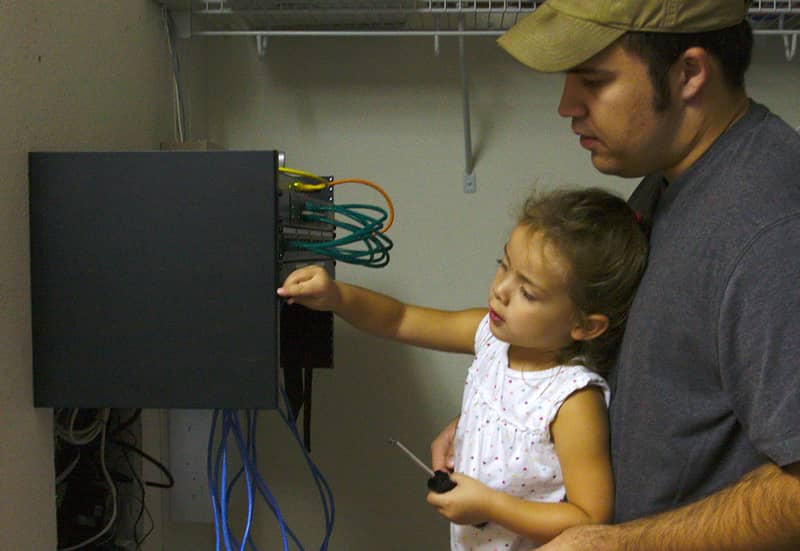
I cut some new Cat5e, and wired up the 12 port patch panel to the telco board. Since the telco board was staying in the original GE panel, I moved it down so that I had access to it regardless of the new 7U bracket placement. I did the same with the DSL (which is isolated on the second incoming line…a little trick an AT&T tech helped me out with). You can actually see that panel being installed by my helper Alli. She’s now knows how to properly use a screw driver (besides making music with it). I expect toys to be torn apart soon.
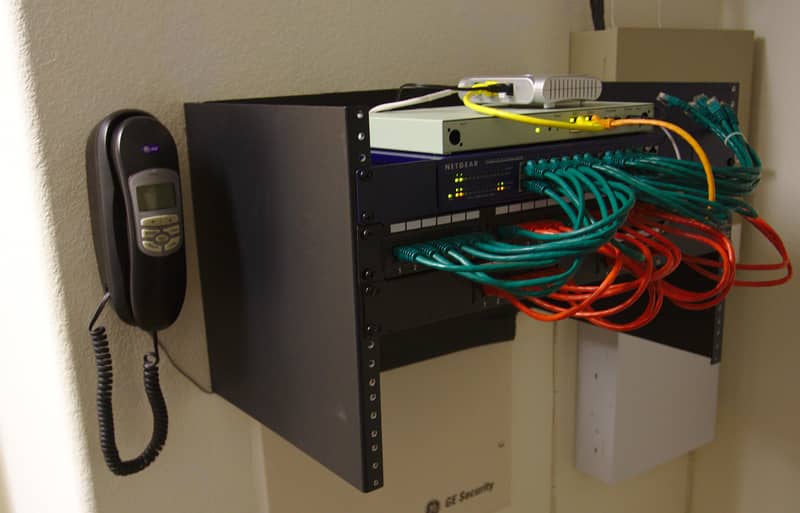
With the patch panels wired, I added in the last few components; racked the switch, set up the new m0n0wall firewall and AT&T DSL modem, powered everything up with no issues. I even added a hard wired phone to the wall, just because.
The final hack to this was what to do with half of the original panel still open below the 7U bracket. Simple solution: use the original GE cover and cut it down to size. Quick measurement and a jigsaw cut later, and we have a nice fitting and clean look.
Final Thoughts
The new 7U bracket and it’s components are significantly more configurable and useful. It’s cleaner wiring, offers a solid 4U of additional space for my next project, and gives me back my much beloved and very missed m0n0wall. Could I have used the original GE panel? Sure. Would it have cost me less? From the price quotes I received not even close. Is this system for everyone? Probably not, but it cost me under $300 (your price will obviously vary) and it works very well for me.