Whiteboard construction is an easy do-it-yourself task; you need very little material and only a few tools.
Unlike most of the articles I’ve read on the subject, my need for my whiteboards was slightly different. I didn’t want to attach them to a wall and stand them up, I wanted them on closet doors. Right behind my desk is a double door closet and the door faces are wasted valuable space just waiting to be used. Lets do this.
The materials
To construct whiteboards, we need some whiteboard like material. You can go out and buy expensive custom-made pieces, but where is the fun in that. Home Depot sells Eucatex Thrifty White Tileboard for a mere $11.87 that works perfectly for the job. It comes in 4x8 sheets, so once cut down, it’ll fit my closet doors nicely with a bit to spare.
I’m attaching these boards to closet doors that are less than 1.5 inches thick and are hollow core, so I decided to drill the appropriate holes and use hollow wall fasteners. If you’ve never used these types of fasteners (often times called molly bolts), when inserted into your pre-drilled hole and the screw is removed, the “legs” expand and it grips the wall. There are many different types with various max weight loads; I used two packs of a 1/4 inch version for a total cost of about $4, but you can also find specific hollow wall anchors designed for hollow core doors and closets.
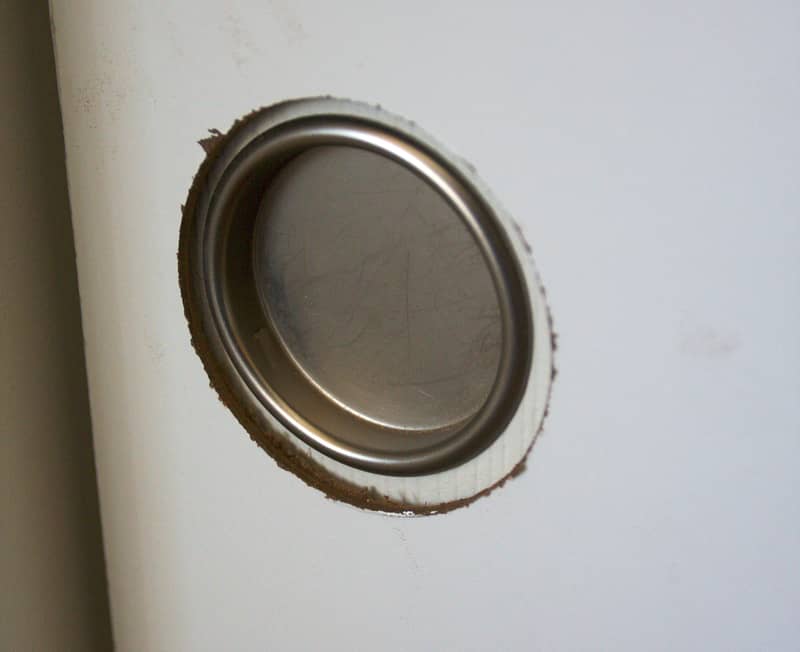
 The door handle cut with slick flaking after the cut with the hole saw.
Just Ribeiro
Note, I used molly bolts because I’m not renting; likely if you are renting you’re not going to want to drill holes into your closet doors in which case this plan won’t work for you. However, you could very well mount a bracket and hooks to the sheet and hang them on your closet door as well.
For this job, I used a circular saw to cut down the sheet of tileboard, a drill to pre-drill the holes, and a 2 3/4 inch hole saw to make holes for the door handles. You’ll also want a roll of masking tape.
A final reminder
Do two things. One, be careful you’re using power tools. Two, check that when you add the tileboard thickness to the back door with the molly bolts, that the doors still close. If you don’t have enough clearance, you’ll end up with doors that will not shut.
Making magic happen
I measured my doors and transferred my numbers to the sheet. The key to this is that you want to use the masking tape to mask your cut lines on the tileboard itself. Even though you’re cutting with the finish side down, the tileboard has a tenancy to chip, which results in a not so clean look (through the cut itself could still be clean). Even with the masking tape and sharp blades, you’ll still see some chipping possibly (see hole saw cut photo).
 Verify that the thickness of your tileboard and bolts will work for your closet doors before install.
Justin Ribeiro
Once you’ve got your sheet cut down to size, pre-drill your holes in the sheets and then get a wife/kid/friend to help you hold them in place to the closet door. Make a mark on the door where your holes will be. Don’t have help? If you measured and drilled, you could simply measure and drill the door. Pre-drill with the appropriate bit for the type of molly bolts you’re using and insert your molly bolts.
Grab sheet, insert bolt into tileboard sheet, thread into molly bolt and bam! You have yourself whiteboard closet doors.
Easy cleaning
After some use, you may notice that the board seems to have that dry erase ink residue all over it. Expo Cleaner, available at your favorite office supply store, will clean it nicely.
I am not original
To say that I’m the first to come up with the “use-tileboard-as-cheap-whiteboard” would be not true. Lots of people have done this same trick, I simply applied it to closet doors. Other links that you might find helpful:
- Marker Board Walls from CoolTools
- DIY Whiteboard from Blake Perdue
- DIY Whiteboard on the Cheap from John Murch
These are only three links I picked out; there are many more if you search via Google that may just get your creative juices flowing. Look around your house/apartment/dorm room and don’t afraid to be creative (but don’t blame me if a wall falls down!).