In preperation for my talks at DevFest, I decided to change my implementation of my onscreen timer. Originally, I had it built directly into the slides and I had a fairly pieced together solution. I wanted to simplify it as much as I could and re-use as needed.
Enter Polymer and a special build of mosquitto.
Fast porting into Polymer
I’m not going to go over how I got Mosquitto broker to talk over websockets. If you really want to know, see my last blog post on the nitty gritty build details. Let’s instead talk about Polymer.
I was up against the clock. I had two presentations to give and three hours of Polymer codelabs. I couldn’t spend a great deal of time on building a fresh tag. Knowing I already had the basic building block of the timer done, I focused on porting what I had along with the Paho’s JavaScript implementation.
Setting the attributes
I knew that the tag needed to handle certain attributes:
- Title in the template
- Host information (hostname, port)
- The broker topic to listen for
- Debug flag (because I wanted to cut down on console chatter)
Doing this in Polymer is pretty simple:
<!-- Import Polymer -->
<link rel="import" href="../bower_components/polymer/polymer.html">
<script src="mqttws31.js"></script>
<!-- Define your custom element -->
<polymer-element name="glass-timer" attributes="title host port topic debug">
From there, we can set defaults:
Polymer('glass-timer', {
title: 'Glass Timer',
host: '',
port: '',
topic: '#',
client: null,
timeout: 3000,
debug: false,
// more things...
});
And I was off for with flying start. Now there are a lot more attributes that I could be handling (cough useSSL, cleanSession, timeout cough) but I figured I could always circle back later.
Build a quick template
Templates are nice. It’s even nicer when I don’t have to wire them with 27 libraries. I stuck to the basic format I had previsouly which was designed with a layout boundry and was supposed to live in a reveal.js presentation:
<template>
<style>
/* Create a Layout Boundary */
#statpack {
left: 10px;
bottom: 10px;
width: 250px;
height: 100px;
overflow: hidden;
position: absolute;
}
#glass-status {
position: relative;
vertical-align: top;
z-index: 30;
bottom: 0;
padding: 0.5em;
}
#glass-status h1, h2 {
margin: 0.6em 0;
}
</style>
<div id="statpack">
<aside id="glass-status">
<h1>{{title}}</h1>
<h2>{{timer}}</h2>
</aside>
</div>
</template>
Breath life into it with Paho JS
The primarly lib that makes this all come together is Eclipse Paho’s JavaScript implementation: Paho JavaScript Client. It handles all the heavy lifting, but we still need to wire it up.
Polymer('glass-timer', {
title: 'Glass Timer',
host: '',
port: '',
topic: '#',
client: null,
timeout: 3000,
debug: false,
created: function() {
this.clientid = "glasstimer_" + parseInt(Math.random() * 1000, 10);
},
ready: function() {
this.client = new Messaging.Client(
this.host,
parseInt(this.port),
this.clientid
);
this.client.onConnectionLost = this.onConnectionLost.bind(this);
this.client.onMessageArrived = this.onMessageArrived.bind(this);
//
// For the sake of this example, we'll just define this here.
// Ideally, this would be passed in as an attribute
//
this.options = {
timeout: 3,
useSSL: false,
cleanSession: true,
onSuccess: this.onConnect.bind(this),
onFailure: this.onFailure.bind(this)
};
this.connect();
},
connect: function(){
this.client.connect(this.options);
},
onConnect: function() {
if (this.debug) {
console.log("glass-timer: Connection Establisted to " + this.host + ":" + this.port);
console.log("glass-timer: Subscribed to topic: " + this.topic);
}
this.client.subscribe(this.topic, {qos: 0});
},
onFailure: function(response) {
if (this.debug) {
console.log("glass-timer: Connection Failed, " + response.errorMessage);
console.log("glass-timer: Attempting reconnection in" + this.timeout + "ms");
}
setTimeout(this.connect, this.timeout);
},
onConnectionLost: function(response) {
if (this.debug) {
console.log("glass-timer: Connection Lost, " + response.errorMessage);
console.log("glass-timer: Attempting reconnection in " + this.timeout + "ms");
}
setTimeout(this.connect.bind(this), this.timeout);
},
onMessageArrived: function(response) {
var ret_topic = response.destinationName;
var ret_payload = response.payloadString;
if (this.debug) {
console.log("glass-timer: Message Arrived, topic:" + ret_topic + " payload:" + ret_payload);
}
// We're expecting a number from Glass
if (typeof Number(ret_payload) === 'number'){
var prettyTime = this.msToPretty(ret_payload);
this.timer = prettyTime;
}
},
// Let's just keep this simple, no fancy
msToPretty: function(rawMs) {
var ms = rawMs % 1000;
rawMs = (rawMs - ms) / 1000;
var secs = rawMs % 60;
rawMs = (rawMs - secs) / 60;
var mins = rawMs % 60;
return mins + 'm ' + secs + 's ' + ms + 'ms ';
}
});
Looks complicated? Nah, it’s pretty straight forward. Let’s break it down.
When our tag is created we generate a clientid on the fly:
created: function() {
this.clientid = "glasstimer_" + parseInt(Math.random() * 1000, 10);
}
Then when things are ready, we connect:
ready: function() {
this.client = new Messaging.Client(
this.host,
parseInt(this.port),
this.clientid
);
this.client.onConnectionLost = this.onConnectionLost.bind(this);
this.client.onMessageArrived = this.onMessageArrived.bind(this);
//
// For the sake of this example, we'll just define this here.
// Ideally, this would be passed in as an attribute
//
this.options = {
timeout: 3,
useSSL: false,
cleanSession: true,
onSuccess: this.onConnect.bind(this),
onFailure: this.onFailure.bind(this)
};
this.connect();
}
The key takeaway here is that we use .bind(this) to make sure things remain bound and we don’t lose this.
Everything else is simply the callbacks we need to listen for to handle the connections to the broker. onMessageArrived listens for messages from the broker. onConnectionLost tries to reconnect if things go south. And so on.
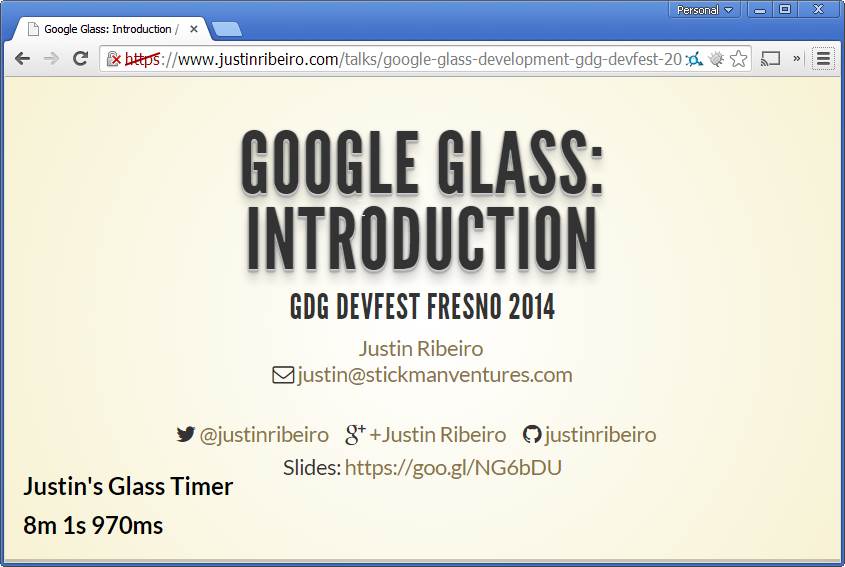
Put it together and what have you got?
Once the tag is up and running, it’s only a matter of importing and using it as needed:
<glass-timer title="Justin's Glass Timer" host="MY_HOST" port="9001"
topic="justin/device/glass" debug="true"></glass-timer>
And then the magic happens as seen in the screenshot below.
All the code for your use
There are lot of things to fix and make better, but it took me less than an hour to port this into Polymer for the win. Honestly, it took me longer find my previous implementation notes. :-)
All the code is on github: Polymer polymer-glass-timer-mqtt tag and my GDK MQTT Glass Timer application. Powers combined, it makes for some nifty cool slides.

